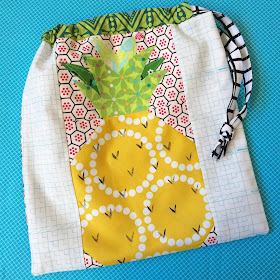
So, here we go!
Materials
Background print- 6.5x4.5 inches, 2.5 inch squares (2), 1.5 inch squares (2)
Yellow for pineapple- 6.5 x. 7.5 inches
Green leafs:
Leaf 1- 3.5x5 inches
Leaf 2- 2.5x3.5 inches
Leaf 3- 2.5x3.5 inches
Bag side strips- 11.5x3 (2)
Bag top- 2.5x21
Drawstring- 2.5x36
Lining- Approximately 22.25x11 inches
Backing- Approximately 11.5x11.5 inches
Heat & Bond
Chalk/soluble pen
Scissors
Green thread
Black acrylic paint
Fine paint brush
Draw a diagonal line from corner to corner on all 4 background squares.
6.5 is the width and 7.5 is the length of the yellow pineapple print.
2.5 squares go on the top of your pineapple and 1.5 squares go on the bottom as shown in the photo. Sew on the line to your pineapple print. Cut a .25 from the sewn line and press seams.
Place your your 6.5x4.5 inch background print above and align with your pineapple print. Take your Leaf 1 (3.5x5) print on top of the background print and align the bottom edges. From here we want to mark the quarter inch marks that are needed to sew our first leaf print down. Ensure you mark the green leaf print .25 inches from the yellow pineapple print on the bottom on each side. Mark the green print and the pineapple block.
Cut your Heat & Bond pieces as listed below
Leaf 1- 3.5x4.75 inchesLeaf 2- 2.5x3.5 inches
Leaf 3- 2.5x3.5 inches
Adhere each H&B to the leaf prints. Note Leaf 1 is a quarter inch shy (see photo)
Now its time to sketch out our leaves. Just wing it- I did.
Then cut them out and peel the backing.
Heat press the leaves as pictured below. Make sure the bottom of your large green print has the quarter inch without the H&B. Note those quarter inch marks on the pineapple block we made earlier! That is where you are going to line up your main green print. Top stitch with green thread.
Sew your leaf top to your pineapple! Your leaves should line up to the pineapple top perfectly.
Break out that acrylic paint and paint on the fabric with little "V" as desired. My original pineapple had diagonal lines painted on it and boy was it a HOT MESS! But do what you love. I used a paper towel on the backside before painting to protect my work surface.
After that is dried up, attach the two side panels and trim excess if needed.
Sew them together with right sides together. If you lay each piece down, ensure your backing is on the left and the pineapple is on the right. This is important for the drawstring.
Sew along the seam.
In other words, place the backing piece on top of the pineapple piece (right sides together) and sew on the left side.
Open and press.
Now, Lay your lining print with the right side up and put the pineapple piece on top (right sides together). Trim any excess lining.
Put that aside and lets make the top piece of our bag where the drawstring will be in.
Take your 2.5x21 inch bag top print and fold in a quarter inch on the end, then again. Press and sew on both sides.
Fold this piece in half and press.
Lay your lining piece up, then the folded bag top with an inch or so away from each side, and your pineapple piece on top (right sides together). Ensure the folded part is facing downwards. Stitch along the top completely.
Open and press towards the lining.
Now take your bag and fold it over to line up the side edges as pictured below. Sew the left side of the bag. Then sew the bottom (the bottom of the pineapple block). Now sew the lining together and leave a wee bit so you can flip the bag inside out.
Close up the bag after your flip it! Place the lining inside the bag and press in place.
My lighting starts to suck from here... sorry, it was getting late.
We're so close to being done!! Time for the drawstring!
Press the drawstring piece in half. Open and take each raw edge to your center and press again. Fold and sew with at an eighth of an inch from the edge.
Put a safety pin on that edge and pull through the top of the drawstring bag. Tie together and clip the edges on the diagonal.
BOOM- we've got a bag!
I really hope that was not complicated, please email me or leave a comment below with any questions.
Enjoy!
Jess


Love, love, love this. Going to make some up as soon as i can get out from underneath my Christmas sewing, lolol. Thanks.
ReplyDeleteI liked the content on this site. Would like to visit again.
ReplyDeleteIATA Hand Luggage
Thomas Cook Hand Luggage